
Get v1: First public release.
This mod implements in-game joystick calibration for My Summer Car. This is sometimes needed for these reasons:
In addition, this mod implements adjustment for deadzone (more precise than the in-game one) non-linearity.
Note: This mod currently doesn't use ModLoader, so don't try putting the .dll in the mods/ folder. It will not work. Follow the instructions instead.
C:\Program Files (x86)\Steam\steamapps\common\My Summer Car\mysummercar\_Data\Managed (adjust the path if necessary if different Steam/steamapps directory is used).cInput.dll there.cInput.dll from the .zip there (overwriting the original cInput.dll).C:\Program Files (x86)\Steam\steamapps\common\My Summer Car\mysummercar\_Data\Managed (adjust the path if necessary if different Steam/steamapps directory is used).cInput.dll there with the original one you surely made a backup of.Here's a description of what all the panels in this mod do. For the impatient, the section Calibration steps is where the actual calibration is done.
Pause the game and press the 'Calibrator' button in the top left corner to show and hide the calibrator UI:
In the top right corner, you will see the state and configuration of each joystick axis mainly for debugging:
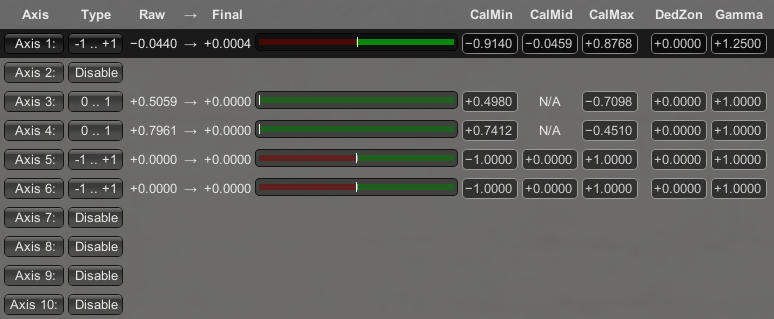
Here's a description of what those fields mean:
0 .. 1 (gamepad triggers and pedals) or -1 .. +1 (analog sticks, steering wheels, D-pads). Also Disable can be used to hide any unneeded axes (the game won't see them either).In the bottom right corner, you will find buttons for doing the actual calibration.

To actually do the calibration, just go through each row of buttons from top to bottom:
Prev/Next joystick and Prev/Next axis buttons.0 .. 1 and -1 .. +1 buttons. Basically:
-1 .. +1.0 .. 1.Set Min button.
-1 .. +1: Leave the analog stick/D-pad/steering wheel centered, then press the Set Mid button.Set Max button.
Save calibration button to save the changes. **There is currently no auto-save of settingsFor deadzone adjustment, edit the number in the DedZon column manually. This adjustment is independent of the one in-game, so you should set the slider in the game options to zero to avoid any weird behaviour.
For non-linearity adjustment, edit the number in the Gamma column manually. Try values in the 0.5 .. 2.0 range. Default value of 1.0 gives a linear response (no non-linearity).
To see effect of these fields more clearly, the axis selected with the Prev/Next joystick and Prev/Next axis will be shown in the graph panel:

For example, I use a value of 1.25 (graphed above) with my old and crappy Logitech Driving Force wheel, this makes it less 'twitchy' during straights.